A healthy gas flame doesn’t shout. It hums. You want a steady, slightly rounded blue tip. Quiet. Responsive to the knob. If your burner is acting up, the fix might be simpler than you think.
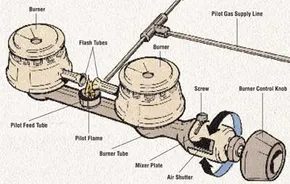
Most issues stem from airflow. The culprit is usually the air shutter mixer plate. This small metal component sits at the end of the burner tube, right near the controls. It controls how much oxygen mixes with the gas before ignition.
The adjustment is straightforward. Locate the plate. Turn the small screw. Slide the plate open or closed to change the air gap. Tighten the setscrew once you have the right mix.
Watch the flame color. It tells the truth.
Yellow flames mean starvation. Not enough air is getting in. Open the plate slightly. Let more oxygen in. The blue should return.
Roaring flames? That’s too much air. The gas is rushing in without enough oxygen to burn cleanly. Close the plate slightly. Quiet the roar.
Servicing Pilot Lights
Older ovens rely on pilot lights. Newer ones use electronic ignition. Both have points of failure. Both require careful handling.
Gas is not a toy. Shut off the supply before touching anything. Use a shutoff valve near the oven or at the main line. Wait for the smell to dissipate. Never force a part.
If the pilot won’t light, check the thermocouple. This safety device senses heat. If it’s cold, the gas valve stays closed. Clean the tip with fine sandpaper. Ensure it’s aligned with the flame. Replace it if it’s cracked.
For electronic igniters, listen for the click. No click? Check the power source. Is the oven plugged in? Is the breaker tripped? If the igniter glows but the gas doesn’t flow, the valve may be faulty.
Don’t guess. If you smell gas, leave. Call the pros. DIY has limits. Knowing where they end is part of the job.
Adjusting the Pilot Flame
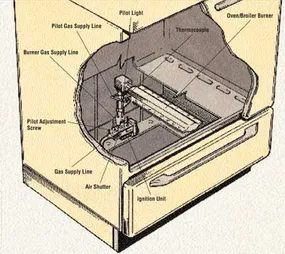
Getting the pilot right matters more than you’d think. One pilot usually fuels all the top burners. Some setups split the difference, using two pilots for each side. You want that flame steady and blue. Keep the height between 1/4 and 1/2 inch.
If the flame flickers out or turns yellow at the tip, it’s starving for air. Too much air? You’ll see a gap between the flame and the tube. Fix it by turning the pilot adjustment screw on the gas line. Go slow. Follow the manufacturer’s instructions strictly here.
Modern ranges ditch the matchbook approach. They use an electronic igniter to spark the pilot. If that pilot is dialed in but the burners won’t catch, look at the flash tubes running from the pilot to the burners. Food spills clog them.
Turn off the power. Grab a short piece of stiff wire. Push it through the tube opening to clear the debris. You might need to disconnect the tube to get a good angle. Reattach it exactly as it was.
If the pilot has a switch, that switch might be dead. Turn the power off again. Grab a volt-ohm-milliammeter (VOM). Set it to the RX1 scale. Unscrew the switch from the cabinet. Disconnect the leads. Clip the VOM probes to the terminals. A reading of zero means it’s good. Anything higher? The switch is faulty. Replace it with an identical unit. Wire it back up.
The Electronic Ignition Shift
Newer ovens don’t have pilots. They use electric ignition. An element glows red-hot when current hits it. That heat lights the gas. It’s like a lightbulb filament, but for gas.
These systems are sealed. You can’t adjust them. You can’t fix them. If it fails, don’t tinker. Call a pro.
Some older electronic setups still have a small pilot. If the flame is too low, adjust it. Find the ignition unit—a small box near the pilot or down the gas line. Turn the screws one notch at a time. Experiment. Keep the flame as low as possible, just high enough to work. On some ovens, set the control to OFF, light the pilot, then switch to BROIL. The pilot heats the ignition switch.
Automatic Shutoff Valves
Some ranges have an automatic shutoff valve in the pilot assembly. It cuts gas if both the pilot and burner are off. If this unit malfunctions, stop. Do not attempt repair. Call a professional.
Other models use an electrically operated valve. Two facing valves. An electromagnet. A manual reset button. A thermocouple sits next to the pilot valve. Electricity holds the valves open. Lose the pilot light, lose the electricity, and the valve slams shut.
To relight it, press and hold the reset button. Hold a match to the pilot. It takes about a minute. Can’t get it lit? Call a pro.
Electric appliances are rising in popularity. Why? Repairs are often just part replacements. Check out the maintenance guide for electric ranges next.
Troubleshooting Self-Cleaning Ovens
Two types of self-cleaning ovens exist. Pyrolytic and catalytic.
Pyrolytic ovens heat up to 1,000 degrees Fahrenheit. They incinerate food into fine ash. The smoke vents out. When done, wipe the ash away.
Catalytic ovens have a special coating. It burns off dirt at normal cooking temps. But you must wipe up major spills immediately. Miss it, and the coating fails.
Caution: Never use commercial oven cleaners on these surfaces. They destroy the finish.
Most pyrolytic issues come from user error. The heat selector must be on CLEAN. The door must be latched shut. At around 600 degrees, the door locks. You can’t open it.
If the oven isn’t cleaning, call a pro. But check these basics first:
- Check the fuse or circuit breaker at the entrance panel.
- Ensure the selector is on CLEAN and the timer is on MANUAL.
- Give it the full prescribed time. Partially clean? Add more time.
- Verify the door is tightly closed and latched.