Your chimney is supposed to do one thing: get smoke out. When the walls crack, that job stops working. Moisture gets in. Insulation fails. Toxic gases leak. It’s a cascade failure waiting to happen.
Mortar joints between stone or bricks flake and wash out after 25 or 30 years. That’s not a guess. That’s standard degradation. Colder climates make it worse. Freeze-thaw cycles act like a sledgehammer. Water enters the masonry. It freezes. It expands. The brick or stone cracks. Any metal attached to the chimney—lightning rods, satellite dishes—gets damaged too.
If you own a historic home, you’re at higher risk. Before oil and natural gas, coal was king. Coal burns hot. Old chimneys were built oversized to handle that heat. Now, they run too cool for modern fuels. Condensation forms inside. The damage starts at the topmost interior walls. It’s hard to see unless you’re on the roof. Neglect turns minor cracks into major repairs.
Location matters too. Seattle’s 2001 Nisqually Earthquake damaged 50 percent of chimneys. Chimneys are rigid. Wood frames flex. Chimneys don’t. When the ground moves, chimneys break. Carbon monoxide can leak into your house. That’s not a maintenance issue. It’s a health hazard.
Check your chimney every one or two years. Look for missing or loose flashing. That’s the metal sheeting where the roof meets the chimney. If it’s loose, water gets behind it. Check the masonry for cracking. Serious problems need a professional. Not all repairs are DIY. Many communities require a permit for chimney work.
If you find a problem, read on.
Tools and Materials for Repair
Clear debris and nests first. Creosote is the tar-like residue from burning wood. It’s flammable. It’s sticky. You need a chimney brush to remove it. Rent one that matches your flue’s inside diameter.
Seal the fireplace opening before you start. Otherwise, you’ll be cleaning soot out of your living room for weeks. Get sturdy footing on the roof. Insert the brush. Move it up and down with pressure. Remove soot without damaging the structure.
Need visual inspiration? Watch Mary Poppins. The chimney sweeping scene is oddly accurate.
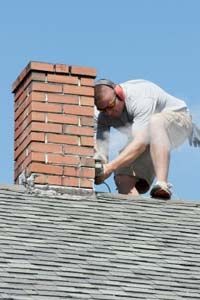
Tuckpointing is the real work. It’s replacing failed mortar with fresh mortar. Use a mortar-raking tool to clean out the old stuff. If that’s not enough, use a masonry chisel and hammer. Break the bad mortar out. Be careful not to damage the surrounding bricks.
Use a mortar hawk to get mortar into tough spots, like horizontal joints. For vertical joints, use a joint filler to spread the first layer. Mix a concrete fortifier or pigment into the mortar if you want the new stuff to match the old. Color matching is hard. Pigment helps.
You’ve got your tools. Now, let’s stop the damage before it starts.
Prevention and Protection
Waterproof the chimney with a vapor-permeable solution. This allows brick to breathe out, not in. Trapped moisture causes cracks.
Repair or replace flashing. If it’s compromised, water gets into the wall structure.
Replace the chimney crown if it’s cracked. The crown is the top concrete slab. It sheds water. If it’s broken, water runs down the sides.
Install a chimney cap. Also called a rain cover. It keeps birds and bats out. It keeps rain out. It’s inexpensive. Do it.
“Chimneys are essentially rigid, they don’t move with a quake, as a wood-framed house can do.”
Neglect is the enemy. Inspect often. Fix small cracks early. Big cracks mean big bills. And carbon monoxide. You don’t want that in your lungs.
Fixing Stone Chimney Cracks and Mortar Issues
Small cracks in stone chimneys are manageable if you catch them early. Clean the area thoroughly. Then use a flexible caulk or concrete bonding material to fill the gap. Follow the manufacturer’s instructions for the specific product. Usually, this involves smoothing the material with a flat-edged tool like a putty knife. If the surface looks uneven after it dries, sand it down to match the surrounding stone.
If the mortar between the stones is crumbling, you have more work to do. Use a small hammer and chisel to remove the damaged mortar. Cut out a square section. Go at least a half-inch (1.25 cm) deep into the joint. Clean the cavity and let it dry until it is damp, not wet. This moisture level helps the new mortar bond properly.
Mix weather-resistant mortar to the consistency of peanut butter. Use a mortar hawk or pointing trowel to pack the mix into the damp joints. Start with the vertical joints, then move to the horizontal ones. Wipe away excess mortar as you go. The mortar should dry until you can leave a thumbprint in it, but it should still be stable. Keep the new mortar moist for the first three to four days to help it cure properly.
Why Proper Repair Matters
Cutting corners on chimney repair is dangerous. Loose stones can fall off. This risks your property and anyone walking nearby. A damaged chimney also fails to function correctly. It can leak dangerous gases like carbon monoxide into your living space.
Addressing Brick Chimney Cracks
Dampness in your attic often points to a leak in the chimney crown. Hairline cracks allow water to enter during heavy rain. These cracks can appear in new construction due to shrinkage.
Strong winds cause stress in the mortar. It takes months for mortar to reach full strength. During this curing period, wind creates tension. Modern builders often insert steel rods to reinforce the structure.
For leaks in the bricks themselves, try a clear silane-siloxane water repellent. This product lets water vapor escape while blocking liquid water. If the issue is mortar, use the repair procedure described above. It works for stone, brick, and concrete chimneys.
Removing Plants Safely
Never pull living plants or vines from a chimney. Their roots are often settled deep into the mortar. Yanking them out damages the structure. Use a herbicide to kill the plant first. Wait for it to die completely. Then cut the stems at ground level. Use a putty knife to gently remove the dead plant material.
Avoiding Epoxy
You might see epoxy injection marketed as a quick fix for chimney cracks. Do not use it. No epoxy is currently guaranteed to withstand the high temperatures inside a chimney. Stick to traditional masonry repairs.
Keeping Your Fireplace Safe
Proper maintenance allows for safe fireplace use. Follow these steps carefully. If you are unsure, hire a professional chimney sweep or mason. Regular inspections prevent small cracks from becoming big problems.