Sanding is the unglamorous backbone of any good renovation. You can’t paint over rough wood. You can’t build sturdy furniture with jagged edges. Whether you are doing light home maintenance or restoring a mid-century cabinet, sanding blocks and power sanders are your primary weapons.
The choice between manual and electric isn’t just about effort. It’s about control.
Understanding Sander Types and Mechanics
At its core, a sander is just a tool that uses abrasion to remove surface material. The simplest version? A hand block holding sandpaper. You move it across the wood. Friction does the work. It’s slow. It’s tedious. But for small patches or delicate curves, it’s hard to beat.
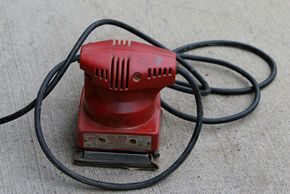
Power sanders change the game. They move the abrasive in patterns that human hands can’t replicate. Each type has a specific job.
Belt sanders rotate a continuous loop of abrasive. They eat through material. Use them for large, flat surfaces where speed matters.
Disk sanders spin a flat abrasive disc in a circular pattern. They are better for smaller surfaces but require care to avoid gouging.
Drum sanders turn a cylindrical abrasive surface. Think of them as belt sanders for flat floors or large tables.
Vibrating sanders move the abrasive back and forth in short, quick motions. They are less aggressive. They excel at finishing. If you want a smooth surface for varnish, this is often your best bet.
Wood floor sanders? They are basically heavy-duty disk or belt sanders with powerful motors designed to handle large expanses of hardwood.
Selecting the Right Grit and Abrasive
Choosing the tool is step one. Choosing the abrasive is step two. Get this wrong, and you’ll scratch your finish before you even start.
Abrasives are identified by grit. The number tells you the fineness.
- Coarse grit (lower numbers like 150 or 220): These remove material fast. Use them for stripping old paint or leveling uneven wood.
- Fine grit (higher numbers like 320 or 400): These are for smoothing. They remove the scratches left by coarser papers.
The material matters too. Flint is standard for general use. Garnet is preferred for hardwoods because it cuts cleaner. Emery and other specialized materials are reserved for finishing metal.
Match the tool to the surface. Belt sanders for big jobs. Vibrating sanders for the final polish. Disk and drum sanders for precision on smaller areas.
Safety First: Dust and Debris
Sanding creates dust. Fine, airborne particles that settle in your lungs and on everything in your house. It’s not optional.
Wear eye protection. Sandpaper can snap. Wood chips can fly.
Wear breathing protection. This is non-negotiable. Fine dust damages your respiratory system over time. A simple mask won’t cut it for heavy power sanding. Use a respirator rated for fine particulates.
Keep your workspace ventilated. Open windows. Use a fan. Better yet, use a sander with a dust collection bag or hook it up to a shop vac.
Maintaining Your Power Sander
Sanding blocks don’t need much. Replace the sandpaper when it’s dull. That’s it.
Power sanders are different. They have motors. Moving parts. And they live in a cloud of fine wood dust. That dust is an enemy. It gets into the motor. It grinds down gears. It shortens the life of your tool.
Clean your sander regularly. Use compressed air to blow out vents and crevices. Don’t let the dust accumulate. A clean sander is a safe sander. And it works better.
When to Use Other Tools
Sand is for smoothing. It’s not for removing large amounts of material quickly. If you need to take off more than just the surface, sanders aren’t the right choice.
Use chisels or planes. They remove wood faster and give you more control over thickness. Sanding is the final step. Not the first.
Why This Matters for Your DIY Project
You