
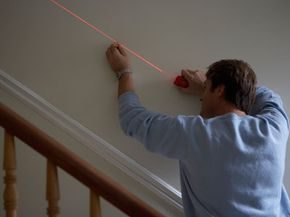
You’re standing on a ladder, clutching a hammer in one hand and a spirit level in the other. The goal is simple: hang a row of frames perfectly straight above the sofa. No leaning towers here. The problem? You can’t hold the level against the wall while simultaneously swinging the hammer. You’d need a third arm.
If you had a laser level in your toolbox, this struggle would vanish. The device projects a crisp, unwavering line across the wall or floor. Mount it to a tripod, or stick it directly to the surface, and suddenly both your hands are free to drive nails, align tiles, or install fixtures. It transforms messy DIY tasks—like wallpapering or building a deck—into precise, repeatable operations.
Most homeowners assume “laser” means “pricey.” It doesn’t. A basic model costs around $20. These tools are staples in construction, civil engineering, and surveying. Framers use them to check if windows and doors are square. If the pros rely on them for concrete work and grading, you should definitely keep one for your renovation projects.
How Laser Levels Work
At the heart of the device is a diode. This solid-state component emits a focused beam of light. The term LASER is an acronym for Light Amplification by the Stimulated Emission of Radiation. When electrons in the diode are stimulated, they release photons. Mirrors or prisms inside the unit direct this light into a single, coherent beam.
Think of it as a digital chalk line. The precision depends on the diode’s size. Smaller is better. A tiny beam gives you an exact reference point. A wide beam blurs the “level” line, making it hard to know exactly where the center lies.
Early versions were useless outdoors because the sun washed out the light. Modern units are brighter and often pair with a detector. You place the detector away from the diode, adjust its height, and wait for a beep or blink when the laser hits it. This allows for high-precision work over long distances, even in daylight.
Most lasers emit red light. Some manufacturers offer green lasers, which are up to 400 percent brighter and easier to see indoors. But there’s a trade-off. Green lasers drain batteries faster. Red lasers are generally more reliable across different temperatures and often more accurate for detailed work.
Safety is non-negotiable. These are low-intensity lasers, but looking directly into the beam can damage your eyes. Wear goggles. Never point the device at another person.
When to Choose a Laser Level Over a Traditional One
A traditional spirit level is still king for small, immediate tasks. It’s perfect for leveling a bookshelf, checking a single tile, or adjusting a portrait frame. You place it on the object, watch the bubble, and adjust. It’s tactile and fast for short distances.
But what if you need a guideline over ten feet?
Laser levels dominate when you need a straight reference over a large area. Installing wainscoting? Use a laser. Putting up a long run of closet shelving? A laser saves you from measuring and marking every single stud. Adjusting a chair rail across an entire living room? The laser does the math for you.
For tasks that require alignment over distance, the laser level isn’t just a convenience. It’s a requirement for professional-looking results. The bubble in a traditional level can drift. The laser stays put.
Mastering the Basics of Laser Levels
You don’t need a degree in engineering to get clean lines. Laser levels are straightforward. They’ve evolved from clunky, expensive tools reserved for massive construction sites into pocket-sized aids that fit in any DIY toolkit.
Every unit shares the same DNA. You have the laser emitter. You have a leveling base. That base sits on the floor, mounts to a wall, or attaches to a tripod. Its job is simple: project light at the exact height you need. Inside, a leveling mechanism keeps things straight. It’s either a bubble vial or a pendulum system with magnets and sensors. The casing? Usually tough plastic or metal. Built to survive a drop from scaffolding.
How They Find “Level”
Not all levels work the same way. Understanding the difference saves you time and money.
Manual laser levels are the old-school option. You look at a bubble vial. You adjust the unit until the bubble sits between the lines. Simple. Cheap. Low battery drain. Perfect for hanging a shelf or aligning a single tile.
Self-leveling units are faster. They assume you’ve placed the tool on a surface that’s close to level. You might use a quick bubble check first, then let the machine take over. Inside, a laser hangs like a pendulum. Magnets and gravity stabilize it. The beam shoots through a prism. Accuracy is higher. Time saved is significant.
For outdoor work or busy sites, electronic self-leveling sensors are the gold standard. They boost reliability where manual checks are impossible. If you’re moving the tool constantly indoors, this self-leveling feature is a game-changer.
“Self-leveling mechanisms help to save time and increase reliability.”
Builder Speak: Level, Plumb, Square
Builders talk in angles. Learn the terms, and you’ll sound like you belong on site.
- Level : Straight across horizontally. Think water resting in a cup.
- Plumb : Straight down vertically. A true vertical line. Gravity’s favorite direction.
- Square : Two lines meeting at a perfect 90-degree angle.
Get these wrong, and your cabinets won’t fit. Your shelves will tilt. Precision matters.
Choosing the Right Tool for the Job
The market is flooded with options. Here’s what each type does and who it’s for.
Point Generators
The simplest entry point. Basically a spirit level with a laser dot. Some flip down a line generator in front of the beam. Cheap. Basic. Good for quick reference points.
Dot Lasers
Project a single point. Can be leveled, squared, or plumbed. Prices range from $20 to over $500. The cheap ones? Stick to indoors. Better models handle sunlight.
Line Lasers
Shoot horizontal and vertical lines. Uses multiple LED diodes. Range: 65 to 100 feet (19.8 to 30.5 meters). Designed for indoor projects. Many include plumb up and plumb down features. Newer models have pulsing light technology. Pair it with a light detector, and you can use it outdoors or in bright rooms. Cost: $40 to over $600.
Rotary Lasers
The heavy hitters. Project a rotating dot to create a 360-degree line. You need a detector to read the beam over long distances. Most also offer single lines and plumb capabilities. Ideal for grading roads, laying foundations, or installing pipe. They are the most accurate. And the most expensive. $250 to over $2,000. Manual or self-leveling. Some run on remote controls. The big ones for foundation work? They’re so large they need a platform or tractor mount.
Why This Matters for Your Workshop
Technology has refined laser levels over the last decade. They’re smaller. More accurate. Easier to use. Cheaper. Contractors used to need two or three people for layout tasks. Now? One person with a laser can do it all.
Engineers use them to lay out building designs faster than ever. Less labor. Less guesswork. In industries like shipbuilding, lasers compare real-time layout data against CAD files. That tech is trickling down to homebuilding soon.
Some high-end models now use Bluetooth. Transmit dimensions directly to a handheld computer. Get site-specific info on the spot. No manual measuring. No transcription errors.
The Future of Precision
Self-leveling models are getting better. Remote controls are becoming standard. Prices keep falling. You’ll see these tools in more toolboxes every year.
It started in 1996. Steve Orosz invented light beam leveling technology for cardiac monitoring. Patent 5836081. Scientists saw the potential for other fields. The laser level was born. For years, it stayed in civil engineering. Large projects only.
Now? Manufacturers have shrunk the size. Reduced the complexity. Lowered the cost. It’s affordable. It’s practical. It’s everywhere.
The trend is clear. As technology improves, features will expand. You’ll buy tools that do more with less effort. The question isn’t whether you need one. It’s which one fits your next project.
Where to Dig Deeper
If you have the technical itch after finishing your leveling project, the rabbit hole goes deep. You might want to understand the actual physics behind the beam. How Lasers Work breaks down the coherence and amplification process, which helps you appreciate why a cheap unit might drift more than a professional grade one. Understanding How Hardwood Floors Work is another smart move. Knowing how wood expands and contracts with humidity explains why your laser line might look perfect today but crack tomorrow if the subfloor isn’t acclimated.
Then there’s the lighting aspect. Most construction sites are poorly lit. Learning How Light Emitting Diodes Work helps you choose the right bulbs for your work area. Brighter, cooler LEDs reduce eye strain during long evening sessions. It seems minor, but fatigue leads to mistakes. And if your project involves stairs, How to Carpet a Stairway offers a different kind of precision challenge. Stairs require exact measurements and consistent rise and run. One miscalculation ruins the whole flight.
Best Resources for DIYers
You don’t have to guess. Kaypro University archives a lot of older but foundational tech knowledge. It’s not just about lasers; it’s about understanding the tools that build our world. For practical, hands-on advice, Ask the Builder is a goldmine. Tom Silva doesn’t just tell you what to do. He shows you why certain methods fail and others hold up over decades. Read their archives on leveling and layout. You’ll find tips that no laser manual mentions.
Credible Sources
The info here isn’t pulled from thin air. It comes from established trade publications. Fine Homebuilding has covered laser technology since the mid-90s. Stuart Baker’s piece from 1996/1997 on “Lasers on the Job Site” remains relevant for understanding the basics. Ryan Jeske’s 2005 analysis in Construction Distribution tracks the evolution from rotary to line lasers. Gary Katz’s 2006 article in Fine Homebuilding, “Laser Levels: Bet You Can’t Buy Just One,” highlights the variety of options available to homeowners. Katy Tomasulo’s 2002 overview in ProSales documents the shift toward greater accuracy and efficiency. These sources confirm that while the tech has advanced, the core principles of precise measurement haven’t changed.