
Garage sales are essentially free recycling centers that pay you in cash. But if you are the buyer standing in the driveway, the thrill of the hunt can quickly turn into buyer’s remorse. You see a table that looks perfect, but by the time you get it home, you realize the veneer is peeling like sunburned skin. Or maybe that office chair only has three working casters.
The problem isn’t finding the items. It’s knowing which ones are worth the drive home.
Many people treat these events like a buffet, grabbing anything that fits in their trunk. But the real skill lies in the rehab. You aren’t just buying furniture; you are buying a project. If you can’t fix it, you’re just buying something to throw in the landfill. This is especially true in tight economic times. Whether you are furnishing a first apartment or just enjoy the adrenaline of a bargain, you need to know the ropes.
Here is how to prepare for the haul so your finds become treasures, not trash.
Packing for the Hunt
Treat a garage sale trip like a safari. You wouldn’t go into the wild without the right gear. You wouldn’t expect to come home with a prize.
Comfort is non-negotiable. You will be walking. You will be bending. You will be standing in the sun. Dress for the weather. Wear shoes that won’t blister your feet. Bring water. Bring a snack if you plan on hitting multiple yards. If you are dehydrated and hungry, you will make bad decisions. You will buy junk.
Build a Tactical Kit
Impulse buying feels exciting in the moment. It feels terrible when you are trying to fit a mismatched mess into a Honda Civic.
Carry a tape measure. Always. If you have an empty alcove by the stairs, know the exact width before you leave. If you don’t, you will come home with a chest that doesn’t fit. Disappointment is expensive.
Bring a tarp. Bring plastic sheeting. Bring painter’s tape. If you find a solid wood dresser, you don’t want to scratch it on the way home. Wrap it up. Secure it.
If you are hunting for larger items, bring rope or bungee cords. You need to strap things to the roof or in the trunk. Do this right. A loose table at 55 mph is a highway hazard and a total loss.
Match the Finish
Keep samples. Keep paint chips. Keep swatches of fabric.
You might find a mid-century chair that is perfect, but the color is off by a shade. If you have your current drapery or paint color in your pocket, you can judge the match on the spot. It saves you a trip to the store. It saves you a return.
Know the Value
Use your phone. Use the internet.
Sites like eBay show you what things actually sell for. If a seller is asking $100 for a lamp, check the listing price. Check the sold items. Is it fair? Is it a steal? Is it a scam?
Having that data gives you peace of mind. It gives you leverage.
And yes. Bring cash. Small bills. Change.
Credit card fees are real. Sellers often refuse cards for small transactions. Having exact change speeds up the deal. It keeps the mood light. It gets you the item before the next buyer shows up.
The First Rule of Furniture Rehab
Finding the item is the easy part. Rehabilitating it is where the value is created.
You can’t just look at the surface. You have to look past the grime. You have to look past the dust. You have to ask yourself: Is this structural damage? Or is it just ugly?
A little elbow grease can fix a lot of superficial wear. But some things are beyond saving. A table with rotting legs is dead weight. A chair with a broken frame is a safety hazard. Don’t buy broken unless you have the tools to fix it. And even then, be honest about your skills.
In the next section, we will look at specific furniture pieces. We will break down what to look for. We will talk about how to assess the damage. We will talk about how to strip, sand, and refinish without ruining the piece.
The hunt is only half the battle.
Assessing Wood: The Truth About Veneer and Solid Stock
You are hunting for a steal, but don’t let the shine fool you. Refinishing wood is labor-intensive. Reupholstery? Forget it unless you want to spend a weekend and a small fortune. You need to look at these pieces with cold, hard realism. Can you actually do the work? Do you have the time?
Wood furniture lies. Solid wood takes a beating and survives. Veneer? Water damage kills it. Pressed wood? Same thing. If you see watermarks on solid wood, or just layers of grime from years of neglect, don’t panic. A little wood soap. A mild abrasive. That’s it. You can save it.
Even a battered piece can become shabby chic furniture if you change the hardware and accessorize right. Strip it. Sand it. Stain it. Modern products make this easier than it was twenty years ago. But if the damage is deep? Loose joints? Broken legs? Split wood? That’s when you call a pro. Or a talented amateur with the right tools. Wood glue and filler fix a lot, but not everything. If you lack the tools, you’ll spend more on repairs than the item is worth. Cheaper to buy new.
If the structure is sound but the aesthetics are tragic, get creative. A table with a gnawed leg (thanks, puppy) can hide behind a skirt. Hook-and-loop tape holds it in place. A side table with a dented corner? Hide it behind a chair. Arrange the room to mask the flaw. Make do.
Upholstery and Appliance Testing
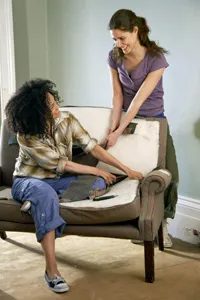
This attitude works for fabric, too. A sturdy couch with ugly fabric can be saved. Professional reupholstery costs a arm and a leg, but if the frame is solid wood with fine detailing, it might be worth the investment.
Now, look at the appliances. People upgrade often. Their old machines still have life left. But don’t buy a clunker. Test everything. Stick to brand names you know. Why? You can find the operating manual online. Get care instructions. Keep a bag of batteries in your car. Test battery-operated electronics on the spot. Rechargeables work best here.
Before you pay, check for recalls. Go to Consumeraffairs.com. Or Consumer Reports. A quick search could save your life. Bring a smartphone. Use it.
Evaluate carefully. Buying a DVD player without testing it? Bad idea. Bring a disc. Test it. Don’t trust the seller’s word. Electronics sitting in a damp basement for months often die silently. The seller might not even know it’s broken.
What if you see a lamp with a broken cord? Or a coffeemaker with a cracked carafe? Don’t walk away. Some parts are easy to replace. Lamp internals are generic. Swap them out. Replacement carafes are available at hardware stores. You can research how to reinvent these items. It takes ingenuity. But it saves money.
The Shabby Chic Philosophy
What is shabby chic style? Some call it eclectic elegance. Junk style. Faded glory. It doesn’t matter what you call it. The goal is making old, discarded things valuable again. Is it nostalgia? Or just saving money? Both. It keeps useful items out of landfills. Peeling paint becomes a feature. Rust becomes part of the decor. It’s a strategy. A popular one.
Cleaning and Safety Protocols for Secondhand Playthings
Toys get tossed out all the time. They aren’t broken. They just aren’t wanted anymore. This creates a market for recycling. But safety comes first.
Check Consumeraffairs.com for recall data. A toy might look fine. It might be on a recall list. You need to know.
Cleanliness is the other big hurdle. You are buying someone else’s clutter. Ebay.com offers guidelines here. If the toy takes water, put it in the dishwasher. The water hits 140 degrees Fahrenheit. That heat kills germs. It’s a practical solution.
Stuffed animals are different. Wash them with delicates. But first, put them in the freezer overnight. This kills dust mites. Simple. Effective.
Bring batteries when you shop. Test battery-operated items. Don’t assume they work. Check games and multi-part toys. Make sure every piece is in the box. Missing parts ruin the experience. It’s especially bad if the toy is a gift.
Age recommendations matter. Just because it’s in good condition doesn’t mean it’s right for the kid. Check the label. Ensure it’s age-appropriate.
Reselling Strategy for Refurbished Items
Found something valuable? Think about selling it online. Auction sites are cheap ways to start a small business. You can sell refurbished goods. Or hand-crafted items. The internet makes this accessible.
Sourcing Textiles and Apparel at Sales
Moving on to fabric. And clothing. These finds have their own rules.
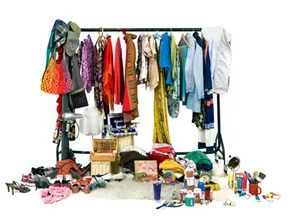
You’ve won the bid. You’ve got that silk blouse or the heavy wool coat in your bag. But before it hits your closet, there is a mandatory step that separates the savvy thrifter from the person who accidentally brings home someone else’s hygiene issues.
Bring it home. Wash it. Or dry-clean it.
This isn’t just about etiquette. It’s about health. Secondhand clothing carries residues from previous owners, storage environments, and the general grime of garage sales. Delicates? Lace? Fine knits? Hand wash those or take them to a pro. Regular machine cycles can destroy delicate fibers that have already seen decades of wear. Treat vintage fabrics with the respect they’ve earned.
Sizing Reality Checks
Let’s talk about the tag. That size six you see on a 1990s dress? It’s not a size six today.
Women’s sizing has shifted. Manufacturers have been slowly expanding dimensions for years. A size six from ten years ago fits differently than one bought at a big-box store last week. The tag is a lie.
Don’t assume the label tells the whole story. Ask the seller about the fit. Better yet, ask to try it on. If you can’t try it on, measure the garment flat against your own clothes.
When in doubt, buy larger.
It is significantly easier to take in a seam than to let one out. Fabric shrinks. Threads fray. You can always tailor a loose fit to your body. You cannot add fabric that isn’t there. This is the golden rule of vintage shopping: always err on the side of roomy.
The Inspection Checklist
Before you hand over cash, you need to hunt for defects. Most sellers won’t point out every flaw. You have to be the detective.
1. Wool Items: The Moth Test
Wool is a favorite snack for moths. Look closely. Small worn spots? Tiny holes? Even if you don’t see the pests, the damage is often already done. Inspect seams and hems carefully.
2. Winter Gear: The Sweat Check
Coats and jackets take a beating. Flip them inside out. Look at the interior linings, especially around the armholes. Perspiration marks are common. They can stain, smell, and weaken fabric over time. If the lining is discolored, walk away. Or negotiate hard.
3. High-Stress Zones
Check the elbows of shirts and jackets. Check the knees of slacks. These areas endure the most friction. Fraying here means the garment is nearing the end of its life.
4. Functionality Check
Pull the zippers. Do they stick? Are they rusted? A stuck zipper on a vintage jacket is a nightmare. Test them. If it jams, it will jam again. Check for missing buttons. One missing button is an annoyance. Three missing buttons is a restoration project.
Negotiating the Flaws
Found a spot? A stain that might come out? Don’t buy it at full price.
Ask for a discount. You are taking on the risk of rehabilitation. You might be the one scrubbing, soaking, or treating the fabric. Factor that labor into the price. If the seller refuses to budge, put it back. There are plenty of other racks.
Garage sales offer fertile territory for recycling clothing, but only if you know what you’re looking for. Pristine condition is rare. Needs work is the norm. Your job is to determine if the work is worth the price.
Next Steps
You’ve bought the item. You’ve cleaned it. Now what?
Salvage might be needed. A loose hem here. A missing button there. Sometimes, you’ll find treasures that need more than a wash. They need restructuring.
Keep your eyes open. The next phase of your vintage hunt isn’t about buying. It’s about fixing. And that’s where the real value begins.