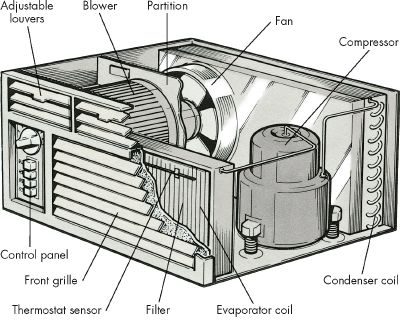
A room air conditioner, commonly referred to as a window unit, operates on the same fundamental principles as a central air system. The main difference? It is significantly smaller and often costs more to run per hour. Depending on the BTU capacity and the layout of your home, a single unit might cool just the bedroom it sits in, or it could manage adjacent spaces if the airflow is directed correctly.
Inside the housing, you will find a compressor, two fans, a motor, and thermostat controls. These components are sandwiched between the condenser and evaporator coils.
Why Dirt Ruins Efficiency
Dirt is the single biggest enemy of window air conditioners. It doesn’t just make the unit look bad. It actively degrades performance.
When dust accumulates, it lowers the efficiency of the evaporator coil. This means the unit has to work harder to produce the same amount of cold air. The fan that blows cool air into your room can get blocked by debris. Filters clog up quickly. Drain ports get obstructed.
If you want to know how to keep your window unit running efficiently, start by keeping it clean.
“Dirt is the biggest enemy of window air conditioners; it can lower the efficiency of the evaporator coil, block the operation of the fan that blows out the cool air, clog filters, and block drain ports.”
DIY Maintenance Basics
You don’t need a degree in HVAC to handle this. Basic cleaning can restore airflow and improve energy use.
- Clean the filters: Most units have removable mesh filters. Rinse them with water. Let them dry completely before putting them back.
- Wipe the coils: Use a soft brush or vacuum attachment to remove dust from the evaporator and condenser coils.
- Clear the drain: Check the drain ports. If water isn’t flowing out properly, use a small pipe cleaner or compressed air to clear the blockage.
- Check the fans: Ensure the interior and exterior fans can spin freely. Remove any leaves or debris trapped in the housing.
Neglecting these simple steps forces the compressor to run longer. That means higher electricity bills and a shorter lifespan for the unit.
Cleaning isn’t glamorous. It’s messy. But it’s the most effective way to maintain cooling power without calling a technician.
Start with the filters. They are the easiest place to begin.
Safety First and When to Call a Pro
The entire engine of a window unit lives inside one metal box. The condenser coil faces the outdoors to dump heat. The evaporator coil faces in to pull heat from your room. It’s a sealed system. The compressor, motor, and coils are not user-serviceable. Trying to open that sealed loop usually means you’re out of luck without a pro.
But don’t hand over the keys just yet. You can handle routine maintenance. You can fix minor glitches. If a major repair is needed, you can save cash by pulling the unit from the window yourself and dropping it at a repair shop. No service call fee. Just the repair cost.
Winter is coming. Or going. Either way, protect the hardware. You have two choices. Remove the unit and store it indoors. Or leave it in place and cover the exterior. Use a commercial cover. Heavy-duty plastic sheeting works too. Secure it with duct tape so wind doesn’t rip it off.
The Capacitor Danger
Stop. Read this twice.
Before you touch anything inside the casing, unplug the unit. This isn’t just a suggestion. It’s a survival tactic.
Window ACs have capacitors. Usually one or two. They sit behind the control panel, near the fan. These components store electrical charge. They keep it. Even after you pull the plug.
Touching a charged capacitor gives you a severe shock. It can be dangerous. Check your owner’s manual. It shows where the capacitors are. It explains how to discharge them safely. If the manual is gone or unclear, call a technician. Do not guess.
Once you’ve verified the power is off and the capacitors are discharged, you can start diagnosing the issue. Look at the symptoms. Match them to the likely causes.
Troubleshooting Your Window Unit
It’s ninety-five degrees. The humidity is sticking to your skin. The AC is silent. You don’t have time to wait for a technician. You need answers. Now.
Check the basics first. Most problems are simple fixes disguised as mechanical failures.
Unit Won’t Start
If the unit is dead silent, check the power source.
1. Power Loss: Inspect the cord. Check the plug. Verify the outlet is live. Look at your main electrical panel. Did a fuse blow? Did a circuit breaker trip? Reset the breaker or replace the fuse.
2. Overload Protection: The motor might have overheated. Wait thirty minutes. Press the reset button. If it trips again, the issue may be deeper.
3. Faulty Switch: Examine the switch terminals. Look for burn marks or melted insulation. If you see damage, replace the switch. If the switch looks pristine but the unit still won’t start, call a professional.
Fuses Keep Blowing
Tripping breakers or blowing fuses indicates a draw that’s too high.
* Circuit Overload: Plug the AC into a different circuit. One that isn’t already powering heavy appliances.
* Low Voltage: If the problem persists on a different outlet, you may have a voltage issue. Contact your power company or a licensed electrician.
Poor Cooling Performance
The fan is spinning. Air is moving. But it’s not cold.
1. Thermostat Settings: Is the setting too high? Lower it by five degrees. See if the compressor engages.
2. Dirty Filter: A clogged filter restricts airflow. Clean it. Or replace it if it’s disposable.
3. Dirty Coils: Dust coats the coils. This insulates them and kills efficiency. Clean them.
4. Blocked Condenser: Check the outside of the unit. Is it blocked by shrubs, debris, or walls? Clear the space around the condenser coil.
5. Mechanical Failure: If the coils are clean and airflow is good, the motor or compressor may be failing. Call a pro.
6. Refrigerant Leak: You cannot fix a coolant leak yourself. If you suspect a leak, call a professional immediately.
Fan Runs, But No Cooling
The fan is blowing. The motor is humming. But the air is warm.
* Thermostat Check: Lower the setting. If the cooling starts, your thermostat was set too high.
* Faulty Thermostat: Test the thermostat. If it’s sending the wrong signal, replace it. Or hire a technician.
* Dirty Coils: Again, check the coils. Dirt is a common culprit here.
* Motor/Compressor Failure: If the coils are clean and the thermostat is correct, the motor or compressor is likely shot. Call for service.
Unit Cools, But Fan Won’t Spin
The room gets cold. The air doesn’t move.
* Control Switch: Reset the switch. Try different settings. Sometimes the logic board just needs a nudge.
* Clogged Fan: Remove the grille. Check the fan blades. Clean off any debris. Tighten the mounting screw.
* Bent Blades: If a blade is bent, it can hit the housing. Straighten it carefully. Or replace the fan assembly.
* Faulty Fan Motor: If the blades are fine and the switch is good, the motor has burned out. Replace it or call a pro.
Cycling On and Off
The unit kicks on. Then off. Then on again. Rapidly. This stresses the compressor.
1. Dirty Coils: Clean them.
2. Dirty Filter: Clean or replace it.
Restricted airflow causes the system to overheat and shut down. It cools down. It restarts. Repeat. Fix the airflow. Stop the cycling.
Next Steps
You’ve identified the problem. You know which parts are safe to touch. The filter. The coils. The switch. The fan blades. These are your friends.
The compressor. The refrigerant lines. The sealed motor. These are someone else’s job.
If you’ve cleaned the filter. If you’ve washed the coils. If you’ve reset the breaker. And the unit still fails? You’ve done what you can. Now you need help.
For more on keeping your home cool, look into central air systems. Or tackle other major appliances. Even fixing a toaster feels easy after you’ve wrestled with an AC unit. Check your thermostat calibration too. A bad thermostat can mimic a broken compressor.
The heat is rising. Don’t let a simple fix become an expensive emergency.
Routine Maintenance for Filters, Cords, and Coils
You can’t ignore the dirty parts and expect the unit to run cool. Neglecting the filter, power cord, coils, switch, and drain ports invites bigger repairs down the line. Here is how you keep the essential components of your room air conditioner in working order.
Cleaning the Filter
Do this at the start of every cooling season. Then, once a month while it runs. Take off the front grille. Pull out the filter. If you live somewhere dusty, do it more often. Most units use a washable filter. It looks like sponge rubber.
Make a solution of mild household detergent and water. Scrub the filter. Rinse it until the water runs clear. Let it dry completely. You cannot put a wet filter back in. Some units have disposable filters. These look like furnace filters. If yours gets dirty, toss it. Buy a replacement of the same type.
Checking the Power Cord
The cord connects your air conditioner to the wall outlet. It wears out. It fails. Then there is no electricity. To check it, remove the control panel. Unscrew the cord terminals. Attach a test wire across the bare lead wires.
Hook the clips of a volt-ohm-milliammeter (VOM) to the prongs of the plug. Set the meter to the RX1 scale. If the reading is zero, the cord is good. If it reads higher than zero, replace the cord. Do not ignore a faulty cord.
Caring for Evaporator and Condenser Coils
Clean these coils at the start of the season. Clean them monthly during use. More often if you live in a dusty area. Use a vacuum cleaner. Go over both the evaporator and condenser coils.
The fins are easy to damage. They are made of light-gauge aluminum. If a fin bends, straighten it. Use a fin comb. You can buy one at most appliance parts outlets. Slide the comb into the spaces between the fins. Be careful. One wrong move and you bend more fins.
Inspecting the Selector Switch
The switch is behind the control panel. It turns the unit on. If the air conditioner does not run at any setting, and you have power, the switch is likely faulty.
Remove the control panel. Find the switch. Check the terminals. Look for burnt insulation or burn marks. If you see signs of burning, replace the switch. Get one of the same type. Unscrew the old one. Connect the new one the same way.
If the problem persists after replacing the switch, call a professional. You might be looking at a deeper issue.
Clearing Drain Ports
Moisture from the evaporator coil drains through ports. The fan blows this moisture against the condenser coil. The water dissipates into the air. But the ports can clog. Dirt gets in the way.
When that happens, water leaks. Usually, it comes out the bottom of the grille. Prevent clogging by cleaning the ports. Use a short piece of wire from a hanger. Or use the blade of a pocketknife. Do this at the start of the season. Do it monthly.
Check the condenser side too. Some models have a drain port along the bottom edge of the cabinet frame. If yours has it, clean it out with the other ports.
Motor and Compressor Issues
If the motor or compressor acts up, stop. Call a professional service person. Do not try to fix the mechanics yourself.
Sometimes the problem is not the unit at all. It could be the thermostat. Before you panic, check if the thermostat is the culprit. You need to know how to check and replace it to be sure.
Testing the Window AC Thermostat
The thermostat is the brain of your window unit. If it fails, the whole system stops making cold air. You don’t need a degree in electrical engineering to check it. Just a screwdriver and a multimeter.
Locate the thermostat behind the control panel. It has a sensing bulb attached. This bulb extends into the evaporator coil area. Its job is simple: sense temperature. The thermostat uses that data to toggle the compressor on or off.
Step 1: Access the unit.
Remove the grille and the control panel. Be gentle. These plastic clips crack if you force them. Once open, you see the thermostat.
Step 2: Mark the location.
The sensing bulb is in a specific spot on the coil. If you remove it, you must put it back in the exact same place. Otherwise, the readings will be wrong. Tag the location before you unclip anything.
Step 3: Remove the thermostat.
Unclip or unscrew the unit. Handle the sensing bulb carefully. It contains gas that leaks if punctured.
Step 4: Test with a multimeter.
Set your volt-ohmmeter (VOM) to the RX1 scale. Clip the probes to the thermostat terminals. Turn the temperature dial to the coldest setting.
- Zero ohms: The thermostat is good. It’s completing the circuit.
- Higher than zero: The contact is broken. Replace it.
Put the new thermostat back. Connect it exactly like the old one. Use the same screws or clips. Don’t improvise the mounting.
Warning: If your thermostat has more than two lead wires (excluding the sensing bulb wire), stop. Do not try to test or replace it yourself. That’s a complex control board issue. Call a pro.
Fixing the Room Air Conditioner Fan
The fan moves the air. No fan, no comfort. When it malfunctions, the problem is usually loose blades or dirt buildup. Noise? Check the tightness. Silence? Check the power.
Tools you’ll need:
– Vacuum cleaner
– Soft cloth
– Screwdriver or Allen wrench
– Long-blade screwdriver
– Wrench
– 20-weight nondetergent motor oil
– Multimeter
Step 1: Open the cabinet.
Gain access to the fan assembly. This usually means removing the front or side panel again.
Step 2: Clean the debris.
Vacuum out the dust. Wipe down the blades with a soft cloth. Dirt adds weight. It causes imbalance. Imbalance causes noise and wear. Keep it clean.
Step 3: Tighten the blade.
Check the fan blade on the motor shaft. Look for the setscrew at the hub. It loosens over time due to vibration.
– Use a screwdriver or Allen wrench to tighten the setscrew.
– If you have a round vent fan, insert a long-blade screwdriver through the port in the fan housing. Tighten the nut on the motor shaft this way.
Also check the bolts holding the fan in its housing. Vibration shakes them loose. Tighten them with a wrench.
Step 4: Lubricate the motor.
Does the fan have oil ports? Apply several drops of 20-weight nondetergent motor oil at the start of the cooling season. Do not use all-purpose oil. It’s too thick. It gums up the bearings.
Step 5: Test the motor.
If the fan still doesn’t run, the motor might be dead. Test it with your multimeter.
– Disconnect the terminal wires from the motor.
– Clip the VOM probes to the wires.
– Set the meter to the RX1 scale.
The reading tells the story:
– 3 to 30 ohms: The motor is functional. The issue is elsewhere (capacitor, wiring, or switch).
– Zero ohms: The coil is shorted. Replace the motor.
– Extremely high number: The coil is open. Replace the motor.
How to replace the motor:
Remove the fan blades first. Disconnect the power wires. Unbolt the mounting bolts. Install the new motor in reverse order.
One hard limit: If you have to move the condenser coil to get the fan motor out, stop. That requires refrigerant system work. Call a professional service person.
Keeping your window unit maintained is a loop. Thermostat checks. Fan cleaning. Lubrication. You handle the routine stuff. You call the experts for the sealed system. That’s the balance.
The air feels cooler now. The noise is gone. But the season isn’t over. The next heatwave will test everything you just fixed.