Your child is in that sweet spot. Past the wobbly baby phase, not yet burdened by the rigid structure of grade school. It is delightful. It is also a logistical nightmare. They move fast. They do not see danger. You can say “no” a dozen times, but until they hit the older end of this bracket, their brains simply won’t retain the rule. They are exploring the real world with intense curiosity. The line between reality and imagination is blurry. Their perceptions are developing at warp speed. This makes them easy to frighten. It also makes them easy to delight.
The goal? A room that celebrates the magic. But it must also handle the chaos.
Visual Complexity and Developmental Stages
Toddlers and preschoolers share high energy levels. Their needs, however, diverge sharply when it comes to decor. A toddler cannot process complex visuals. If you install elaborate wall murals or detailed artwork, you are decorating for yourself. Your toddler will likely just see blobs of color. You might enjoy the nuance; they won’t.
If you are torn between intricate designs and simple schemes, remember that you spend significant time in this space.
If the design makes you happy, that positive energy transfers to the child. That is a practical benefit of prioritizing adult taste in the early years. Wait until your child is a preschooler to go full throttle on complex themes. By age three or four, they can appreciate a favorite storybook motif. You can both enjoy it. Even then, proceed with caution.
Smart Decorating Choices for Curious Minds
When you decide to wait, you have options. You can invest in high-quality pieces that last. Consider expensive trompe l’oeil hand-painting. Render it on canvas or board. Protect it with polyurethane. These pieces endure. When the child outgrows the theme, you can save them for the next generation. That is smart long-term value.
If your youngster clamors for a specific cartoon image, expect it to be temporary. Do not commit heavy renovation effort to it. Opt for posters. Use low-cost pictures.
Use colorful, inexpensive frames. Skip the glass. Choose clear acrylic instead. Glass breaks. Acrylic does not. Tape up a few posters. Change them as interests shift. This approach minimizes waste. It also reduces risk.
Managing Fear and Imagination
Kids at this age struggle to distinguish real from imaginary. This is a critical safety factor in room design. Stick to happy, gentle themes. Classic nursery rhymes. Soft fairy tales. Exercise extreme caution with modern cartoon and movie characters.
What seems exciting to an older child can be terrifying to a toddler. Especially at bedtime. A scary face on the wall becomes a permanent fixture in their dream space. Avoid that trap.
Unless you and your child are truly smitten with a specific motif, consider abstraction. Many parents find that a design suggesting a theme lasts longer. A forest. A beach. Another nature scheme. These are surefire winners for both girls and boys. They serve as a neutral background. They allow for imaginative play without dictating a rigid narrative.
Start with the basics. Keep it simple. Keep it safe. The rest will follow.
why versatile color beats fixed themes
Most parents obsess over themes. Dinosaurs one year. Space the next. It’s exhausting. And it rarely works.
A room based on cheerful color combinations and patterns is far more versatile. Think about it. Tomorrow’s favorite toy fits right in. Today’s collectibles don’t clash. Kids rarely make a clean break from one phase to the next. They coexist. An easygoing design based on color lets several eras and enthusiasms live peacefully.
It’s flexible. It’s sustainable. And it’s easier on your wallet.
the safety reality check
We’re all more comfortable when a room physically fits how we function. But when the occupant is a toddler or preschooler, the stakes skyrocket.
Little ones are hardwired to explore. Fast. They learn by touching, climbing, and tasting. This means they can be in danger wherever their curiosity takes them. Even at home.
Accept this fact: physical safety is up for grabs. Almost all the time. With toddlers. Things get relatively easier with preschoolers, but the risk never truly vanishes.
You can hire a service to childproof your home. Or you can do the research yourself. Basic safety precautions are non-negotiable.
Here is the trick. Walk through your space. Put yourself at your child’s level. Literally. Get down on the floor. Look at what they see. Look at what they can grab.
Kidproofing isn’t fun. It’s work. But there’s a bonus. Making your home safe for a toddler makes the rest of the family safer, too.
Antiscald devices in showers? Good for everyone. Nonslip rug pads? Essential for grandma, too. Common-sense tips make sense for everybody.
where form meets function
Don’t let safety kill the vibe. Form can follow function and still be fantastic.
Below, you’ll see decorating ideas that prioritize safety without sacrificing style. These aren’t just pretty pictures. They are functional spaces designed for young minds.
fabric fair: tying the room together
Once you have all the elements of a room, you need to tie them together. Fabric is the glue.
This idea focuses on cohesive textiles. Curtains. Pillows. Bedding. All in one harmonious palette. It’s not about a single object. It’s about the flow.
castle keep: for the young king
This idea makes your young boy feel like a king. The furniture does the heavy lifting.
Look for castle-inspired beds or turrets. It’s not just decor. It’s a throne. A fortress. It gives a sense of ownership and security.
feminine charms: beyond the nursery
Use this idea to make your girl feel at home. And stay that way.
The goal here is longevity. Not just for the toddler years. Far beyond. Think softer lines, floral accents, and comfortable seating that grows with her.
step right up: circus vibes
Children’s imaginations are wild. This idea gives them a playground.
A circus theme is more than just red and yellow stripes. It’s about movement. It’s about spectacle. It stimulates the mind while providing a structured environment for play.
garden bright: more than just flowers
This idea blooms into a decor that goes far beyond mere flowers.
Think organic shapes. Greenery. Natural light. It’s a retreat. A place to breathe. It connects the indoors with the outdoors, which is crucial for developing kids.
girlhood charm: staying connected
Your active young daughter can stay connected to her feminine side.
This isn’t about pink. It’s about identity. It’s about giving her a space that feels uniquely hers, even when she’s running around at full speed.
princess in residence: furniture as theater
This idea blurs the lines between furniture and theater.
For your little girl, the room is a stage. The bed is a carriage. The chair is a throne. It encourages role-play. It encourages storytelling. It turns sleeping into an adventure.
fairy-tale forest: enchanted entry
Your child can step out of bed and into an enchanted forest.
This isn’t just a print on the wall. It’s an immersive experience. Think woods, trees, and hidden creatures. It sparks wonder.
raring to go: colorful fabrics
Begin with a design that uses colorful fabrics.
This look is loved by young girls. It’s bold. It’s bright. It’s energetic. It sets a tone of excitement right from the moment they wake up.
where to go next
If you need more inspiration, look deeper.
- Kids’ Rooms
- Baby Nursery Decorating Ideas
- Kids’ Bedroom Decorating Ideas
- Teen Bedroom Decorating Ideas
- Playroom Decorating Ideas
- Kids’ Bathroom Decorating Ideas
- Safety Tips for Decorating Kids’ Rooms
- Kids’ Rooms Decor
The work isn’t done. But the foundation is set. Safety first. Style second. Both matter.
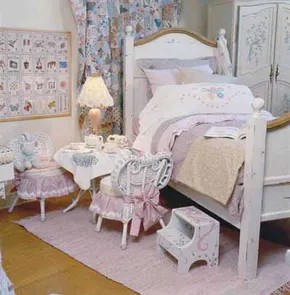
Scalloped edges on nursery furniture aren’t just decorative fluff. They define the entire aesthetic of a girl’s bedroom set. You buy the bed. You grab the dresser. You finish with the desk. Then you stop.
That’s where most projects stall.
Look at the room in the photo. It breaks the mold. The secret isn’t the furniture shape. It’s the paint. It’s the fabrics. It’s the dressmaker details that turn standard pieces into something captivating.
The color palette drives the mood. Chartreuse. Pink. White. The mix feels lighthearted. It feels like spring, all year round.
Paint and Texture Strategy
The heavy lifting comes from the bigger items. The main furniture pieces are off-white. They have soft, pretty lines. This neutral base lets the accessories shine. Small items made of knotty pine get custom-painted treatments. They pop against the larger structures.
Fabric choice is where the style happens. You don’t need expensive silk. Simple cotton works best.
Mix your scales. Use small prints. Use medium prints. Use large prints. Lavishness is fine, but balance is key. The shared color scheme ties everything together. Without that common thread, the room looks cluttered. With it, it looks designed.
Castle Keep Toddler Bedroom Decorating Idea
Designing a custom kids room with local artisans
Designing a custom kids room with local artisans
If your youngster’s bedroom is large enough to breathe, you have a blank canvas that most adults would kill for. Big spaces don’t just happen. They require intention. And if you know someone who can actually build things—think local cabinetmakers, woodworkers, or even a friend with a serious table saw—you’re not just decorating. You’re engineering a environment.
The “sky is the limit” cliché usually leads to clutter. Here is how to avoid that trap.
Start with the bones. A standard bed frame is boring. A built-in? That’s different. It anchors the room. It creates storage where none existed before. Custom joinery turns dead space under stairs or into eaves into functional zones. This isn’t about buying cute IKEA stuff and hoping it fits. It’s about measuring twice and cutting once.
The benefits of local craftsmanship
Why bother with local makers? Speed and specificity. You can walk into their shop. You can touch the wood. You can argue about the stain color while drinking bad coffee. The communication loop is short. Misunderstandings get caught early. A national retailer won’t do that. They’ll ship you a box that doesn’t fit.
Materials matter here. Solid pine? Plywood? Reclaimed barn wood? The choice dictates the vibe and the durability. A teenager will abuse a room. It will look like a tornado hit it. Custom furniture can be built to withstand that. Thicker joinery. Harder finishes. It survives.
Planning the layout
Big rooms tempt you to spread out. Don’t. Cluster zones. Sleep zone. Study zone. Play zone. Each needs distinct boundaries. Custom shelving can create those boundaries without blocking light.
Consider the ceiling. If the room is tall, use that verticality. High shelves for out-of-season gear. Wall-mounted desks that save floor space. The goal is to keep the center clear for movement. Kids need to run. Or dance. Or just exist in a chaotic way.
Safety and installation
Custom pieces can be heavy. Ensure the wall studs are located and marked before you start mounting anything substantial. Lag bolts into studs, not drywall. Drywall anchors fail. Always. This is non-negotiable.
Sand all edges. Sharp corners are a liability. A nice radius on a bookshelf edge prevents a bruised shin at 2 AM. It’s a small detail. One that saves a trip to the ER.
Balancing cost and creativity
Local work isn’t cheap. You pay for the skill. But you also get exactly what you asked for. No compromises. If the budget is tight, mix. Build the big items custom. Paint the walls yourself. Let the homeowner’s sweat fill the gaps. That’s the DIY spirit. It’s not about doing it all. It’s about knowing where your input adds the most value.
What happens when the kid outgrows the theme? Custom pieces age better. A simple, well-built desk doesn’t scream “toddler” in five years. It just becomes a desk. That longevity is a quiet win.
The room becomes less about the furniture and more about the space it creates. Open. Flexible. Yours.
That room isn’t just a fantasy. It’s a clever storage hack dressed up as a medieval fortress. Every crenelation, every battlement. It all serves a purpose. If you look closely, the “castle” elements are actually drawers, shelves, and cubbies. For a kid, this is gold. They get the adventure they want. You get the clutter under control.
To pull this off, you need to understand what makes a castle look like a castle. It’s not about historical accuracy. It’s about bold, simple shapes. Kids respond to big blocks. They don’t care about mortar details. They care about the silhouette.
How to Build a Fantasy Room with Function
Start big. Think about the footprint of the room first. You’re not just painting walls. You’re building structures. Use a kid-friendly concept as your anchor. Then break it down into manageable steps. Plan every inch. A vague idea leads to a messy room. A detailed plan leads to a space they’ll remember forever.
Safety and Simplicity First
Since this is for a little boy, keep the shapes clean. Sharp corners are a no-go. Round out the edges of your built-ins. Use soft paints for the main structure. Reserve the “stone” look for texture that doesn’t impinge on play space.
Check out Feminine Charms if you’re decorating for a girl instead. The next page flips the script entirely. But for now, focus on the castle.
More Ideas for Every Kid’s Space
Need more inspiration? These categories cover the whole house:
- Kids’ Rooms
- Baby Nursery Decorating Ideas
- Kids’ Bedroom Decorating Ideas
- Teen Bedroom Decorating Ideas
- Playroom Decorating Ideas
- Kids’ Bathroom Decorating Ideas
- Safety Tips for Decorating Kids’ Rooms
- Kids’ Rooms Decor
The key is blending the imaginary with the practical. Don’t just buy a toy chest. Make the toy chest a turret. Make the bookshelf a keep. It’s about perception. And storage. Mostly storage.
Wallcoverings and fabrics are the easiest way to inject a lighthearted, girlish vibe into a bedroom. The spaces shown here prove that you don’t need a massive budget to make it work.
Whether you lean toward a clean contemporary palette or something softly antiqued, the options are endless. Pastel florals, stripes, and plaids create simple charm without trying too hard.
But a girlish scheme needs grounding. Otherwise, it floats away into cliché.
To give it substance, bring in a piece of furniture with serious lines. Something with eye-catching details or an heirloom background anchors the room.
In the rooms shown, that job is handled by two distinct pieces.
An elaborately scrolled daybed.
A weathered armoire with latticed doors.
These aren’t just decor. They’re investments.
Pieces like these have staying power. They last until your girl heads off to college. Then they move to the guest room. Still charming. Still useful.
“Ground your scheme with furniture that has character, not just color.”
All children love the circus. It’s universal.
So, why not bring that energy into the mix?
The next page explores a decorating idea built on that theme.
For more decorating ideas, see:
- Kids’ Rooms
- Baby Nursery Decorating Ideas
- Kids’ Bedroom Decorating Ideas
- Teen Bedroom Decorating Ideas
- Playroom Decorating Ideas
- Kids’ Bathroom Decorating Ideas
- Safety Tips for Decorating Kids’ Rooms
- Kids’ Rooms Decor
Step Right Up Toddler Bedroom Decorating Idea
Circus themes dominate children’s bedrooms. It is a safe bet. Most executions are loud. They rely on primary colors and cartoonish graphics. This specific room breaks that mold. It is dramatic. It is sophisticated. It does not scream for attention. The art relies on composition, not just hue.
A masterful mural wraps around the walls. It creates a continuous scene. The palette is rich. It is relatively quiet. You do not need neon to create drama here. The mood is grounded. It feels intentional.
Furniture That Bridges Styles
The furniture tells a different story. It is not cheap particle board disguised as wood. These pieces fuse Craftsman, Asian, and modern styles. The lines are clean. The joints are sturdy. They look strikingly handsome. They also handle active kids.
If you value classic toys made of wood, metal, or cloth, this approach mirrors that resilience. You are building an environment that ages well. This is heirloom quality furniture. It survives the toddler years. It survives the teen years.
Why Invest in Durable Kids’ Room Furniture
You might wonder if the extra cost matters. It does. Cheap furniture scratches. It wobbles. It ends up in a landfill within five years. Quality pieces endure. Years from now, you will be glad you did not compromise. Your child might not notice the difference today. Your grandchild will. They will inherit the desk. They will sit in the chair. The aesthetic remains relevant because it is not trendy. It is timeless.
Quality furniture bridges the gap between playful function and enduring design.
Transitioning to Garden Themes
The circus works because it is contained. It has a frame. The next popular theme is the garden. It is open-ended. It brings nature indoors. This approach requires a different mindset. You are not painting a scene. You are cultivating one.
Find out how to bring that concept to your toddler’s room. The shift from structured drama to organic growth is significant. It changes how you select plants. It changes how you handle light. It changes the texture of the room entirely.
For more decorating ideas, see:
-
Kids’ Rooms
-
Baby Nursery Decorating Ideas
-
Kids’ Bedroom Decorating Ideas
-
Teen Bedroom Decorating Ideas
-
Playroom Decorating Ideas
-
Kids’ Bathroom Decorating Ideas
-
Safety Tips for Decorating Kids’ Rooms
-
Kids’ Rooms Decor
Garden Bright Toddler Bedroom Decorating Idea
Why Lime and Aqua Work for Long-Term Girl Rooms
Forget the pink overload. A lime and aqua color scheme offers a fresh-picked aesthetic that stays stylish for years. It’s bright without being loud. It appeals to a young girl’s sense of play while remaining cool enough for teenage years. The trick is avoiding the cliché.
This room proves you don’t need floral wallpaper to feel girly. In fact, floral can age poorly. Plaids and checks in vibrant tints create a sporty, feminine vibe. They add structure. They keep the look grounded. The result is a space that feels intentional, not accidental.
DIY Garden Style: Whimsical but Not Cheesy
Garden themes can easily tip into kitsch. This design takes a tongue-in-cheek approach instead. It’s amusing, not overwhelming. The key is scale. Giant flowers on the walls and floor act as focal points. They are bold. They demand attention. But they are stylized, not realistic.
“A few giant flowers on the walls and floor set the stage with charm.”
Dragonflies at the window add movement. They catch the light. They break up the solid colors. Window boxes filled with wooden blooms bring texture. Wood is durable. It’s safe for kids. It ages gracefully compared to plastic faux-flowers.
Tools and Materials for This Look
If you’re DIY-ing this vibe, you need the right supplies.
- Paint: High-gloss or semi-gloss lime green and aqua blue. High sheen makes cleaning easier. Kids scuff walls.
- Wall Decals: Large-scale floral or dragonfly decals. Look for matte finish to contrast with the paint.
- Fabric: Plaid or checkered cotton for curtains or cushions. Washable fabrics are non-negotiable.
- Wood: Birch or maple for window boxes. Sand them smooth. Non-toxic stain or paint.
Where to Place Key Elements
Placement matters. Giant floor flowers work best in high-traffic areas. They anchor the room. Wall flowers should be at eye level or above. Dragonflies belong near windows. They interact with natural light. Wooden blooms in window boxes add a tactile element. Keep them low to the sill.
Why This Style Lasts
Color trends shift. Floral patterns can feel dated. Plaid and checks are timeless. Lime and aqua are energetic but not aggressive. This combination allows for easy updates. Swap the curtains. Change the accessories. The base remains fresh.
Is there a better way to grow up? Maybe. But this room balances play and style. It doesn’t scream “baby.” It whispers “fun.” And that’s what matters.
The combination sounds odd on paper. Wicker is breezy. Leather is heavy. Put them together in a toddler’s room and you get something unexpected. It works. The space feels confident. It feels cheerful. It doesn’t take itself too seriously.
If that vibe doesn’t fit your family, look at the next option. We are shifting gears now. This is the Girlhood Charm Toddler Bedroom Decorating Idea. It leans into a specific aesthetic. Strong lines. Feminine touches. It’s designed for active young girls who want a space that feels both tough and pretty.
The Girlhood Charm Aesthetic
This theme isn’t about pastels and frills alone. It’s about structure. Think sturdy frames. Soft upholstery. The contrast creates interest. You aren’t just decorating a room. You are curating a personality.
Why this mix works
Parents often worry about durability in kids’ spaces. Leather holds up. It wipes clean. It resists stains better than fabric. Wicker adds texture without the bulk of wood. It brings in a bit of organic warmth. Together, they create a room that can handle play but still look designed.
How to style it
Start with the bed frame. Choose something with clean lines. A metal or wood frame in a neutral tone works best. Then, add the leather. Look for a bench at the foot of the bed. Or maybe a chair. It grounds the room.
Next, bring in the wicker. A basket for toys. A headboard. It breaks up the sleekness of the leather. The mix keeps the room from feeling too sterile.
Where to source these pieces
You don’t need high-end designer labels. Look for second-hand leather chairs. They age well. Wicker is available at most big-box stores. It’s affordable and easy to replace if it gets damaged.
Safety and Practicality
Even with a stylish theme, safety comes first. Anchor all heavy furniture. Leather can be slippery. Make sure rugs have non-slip backing. Wicker can splinter if cheap. Check for smooth edges before buying.
Related Decorating Guides
Need more inspiration? Check these resources:
- Kids’ Rooms
- Baby Nursery Decorating Ideas
- Kids’ Bedroom Decorating Ideas
- Teen Bedroom Decorating Ideas
- Playroom Decorating Ideas
- Kids’ Bathroom Decorating Ideas
- Safety Tips for Decorating Kids’ Rooms
- Kids’ Rooms Decor
The visual impact starts with the color scheme. Think pale greens, dusty pinks, soft yellows, and muted blues. Everything gets a white frosting or matte finish to keep it from feeling too sweet. The result is gentle. Feminine. It sets a tone that feels light and airy.
But look closer. This isn’t just a dollhouse. The layout is practical. It accounts for active kids who move fast and break things.
Furniture is scaled down. Beds lack sharp posts or dangerous corners. There are no tripping hazards. Storage is abundant because little girls accumulate stuff. Toys. Clothes. Treasures. The room needs to hold it all without looking cluttered.
“The look is undeniably girlish and delicate, yet sturdy.”
Durability is baked into the design. You aren’t using fragile materials here. Patchwork fabrics take a beating. Checked patterns hide stains better than solid light colors. Knotty pine, painted and distressed, adds texture. It shows wear rather than hiding it. Nostalgic accents tie it together.
The style leans country. It’s not airy fairy. It’s grounded. It’s meant to survive childhood.
Princess in Residence Toddler Bedroom Decorating Idea
You don’t need to scour high-end boutique shops for the right pieces. Look at ready-to-finish furniture stores. Check resale shops. Even kids’ specialty retailers often stock items that just need a little love. These are the building blocks.
Every girl likes to feel like a princess. It’s a given. The next page shows you how to make her feel like one in her room.
For more decorating ideas, see:
-
Kids’ Rooms
-
Baby Nursery Decorating Ideas
-
Kids’ Bedroom Decorating Ideas
-
Teen Bedroom Decorating Ideas
-
Playroom Decorating Ideas
-
Kids’ Bathroom Decorating Ideas
-
Safety Tips for Decorating Kids’ Rooms
-
Kids’ Rooms Decor
Pink ruffles. They’re everywhere. You see them on little girls’ bedroom curtains and you think you know the vibe. It’s frilly. It’s sweet. It’s predictable.
This room breaks that script.
Look past the fabric. The walls aren’t just painted. They’re illustrated. Murals of magical ponies run along the plaster. Ballroom swags follow the trim. It’s theatrical without being cheesy.
And the ceiling? Don’t ignore it. A central rosette anchors the space. But it’s not plain. Faux tassels hang from it. Heavy fabric details that mimic chandeliers or expensive drapery hardware. Cheap materials used to create a high-end illusion.
It’s not just about pink anymore. It’s about texture. Layering.
The curtains frame the window. The murals expand the walls. The ceiling pulls your eye up. It stops the room from feeling flat.
You can replicate this. Not with a mural artist. But with peel-and-stick wallpaper. Or stencils. For the swags. Paint them. Or use fabric.
The tassels? You can buy them. Or make them from leftover ribbon. It’s about the principle. Adding weight. Adding interest to the vertical space.
Most people stop at the walls. This room goes up. And down. And across.
It feels bigger than it is. Because the eye keeps moving. It doesn’t get stuck.
Is it too much? Maybe. For a five-year-old, no. For a teenager? Probably not. But the layering technique works for any age. Just change the palette. Swap pink for navy. Swap ponies for landscapes.
The structure stays. The eye movement stays. The illusion of depth stays.
It’s a trick. But a useful one. When you’re stuck in a boxy room. Look up. Look down. Fill the empty space.
Don’t just hang curtains. Frame the view. Then decorate the frame.
The woodwork here isn’t just furniture. It’s theater. Every piece in this room blurs the line between functional storage and storybook set design. The design team prioritized simplicity. Safety was never an afterthought.
You don’t need white to make a girl’s room feel feminine. That’s a common myth. This space proves it wrong. Natural wood pairs with pink, rosy red, and gold. The warmth of the grain adds an allure that paint alone can’t match. In the right hands, that wood feels magical.
How to Build a Princess’s Fairy Tale on a Budget
If you’re looking to recreate this vibe, start with the base materials. You’ll need sanded pine or birch plywood for the main structures. Sand them until they’re smooth to the touch. Splinters have no place in a toddler’s world.
The goal is to evoke a forest setting without the clutter. Think less “Disney castle,” more “Cabin in the woods.”
Why Natural Wood Beats Painted Furniture
White furniture is easy to spot. It’s popular for a reason. It looks clean. But it’s sterile. Natural wood brings texture. It grounds the room. When you stain or seal it with a non-toxic, water-based finish, you retain that organic feel.
Pair the wood with soft textiles. A plush rug in terracotta or dusty rose. Curtains in gold silk or satin. The contrast is what makes the room work. It’s not just about the wood. It’s about the interplay of light and shadow.
Safety First in DIY Kids’ Rooms
Before you start building, check your local regulations. Some areas require specific fire ratings for wood finishes in bedrooms. Always use low-VOC paints and sealants. Your toddler breathes more air per pound than an adult. Don’t risk it.
Secure all furniture to the wall. Even a “stable” dresser can tip. Use anti-tip brackets. Round off all sharp corners with sandpaper or corner guards. This isn’t just about aesthetics. It’s about keeping your child safe while they dream.
Where to Source Materials
You don’t need custom millwork. Look for pre-cut kits from big-box stores. Or visit architectural salvage yards. Old beams, reclaimed barn wood—these add character. Just ensure they’re treated for insects and rot.
For the decorative touches, hit the craft stores. Faux greenery, metallic paints, and plush fabrics are affordable. You can DIY a canopy from a tension rod and sheer fabric. It’s cheaper than buying a ready-made canopy. And it fits any window.
Which Decor Items Create the Fairy Tale Look
Focus on lighting. A chandelier in a toddler’s room is a classic touch. Choose one with a lower wattage LED bulb to avoid heat. Soft, warm light enhances the wood tones.
Add mirrors. Children love seeing themselves. But ensure the mirror is shatterproof. Acrylic mirrors are a safe bet. They reflect light and make the space feel larger.
Don’t forget the walls. Paint one accent wall a deep forest green or a soft lavender. The rest can stay neutral. This draws the eye. It creates depth. It stops the room from feeling flat.
Step-by-Step: Creating the Forest Theme
- **Prep the
Transforming a Bedroom into a Storybook Forest
Most kids grow up on Beauty and the Beast and Goldilocks and the Three Bears. So it makes sense that a bedroom themed around an enchanted forest feels less like a decoration and more like an invitation to a story.
The centerpiece is the mural. It isn’t just a wall sticker. It’s a full ceiling-to-floor wrap-around scene. You get castles. Jagged mountains. Fields of wildflowers. And trees draped in garlands. It creates a continuous landscape that pulls the eye upward, making the ceiling feel higher and the room feel endless.
Against this painted backdrop, specific furniture choices anchor the fantasy.
- The Armoire: A large, ornate wardrobe that mirrors the one from Beauty and the Beast. It adds scale and a sense of history to the room.
- The Bed: A custom frame or upholstered headboard that echoes the cozy, rustic aesthetic of Goldilocks’ cottage.
- Supporting Elements: Other small, charming touches fill in the gaps. Maybe a nightstand carved to look like a stump. Or a rug with a moss-like texture.
The goal here is immersion. You aren’t just decorating a room. You are building a world. An imaginative youngster doesn’t just sleep here. They live inside the tale.
“An enchanted forest figures importantly in many beloved fairy tales, so it’s no wonder stepping into this room evokes a magical feeling.”
This isn’t about buying the cheapest props. It’s about coherence. The mural sets the mood. The furniture tells the story. The result is a space that feels dreamlike without looking cluttered.
The challenge lies in execution. Paint by hand for the mural. It requires steady hands and a good lighting setup. Stain the wood for the furniture to match the earthy tones of the wall. If you skip these details, the room looks like a theme park attraction. If you nail them, it looks like a genuine hideaway.
Start with the walls. Paint the base layer before worrying about the bed. The mural defines the lighting needs of the room, too. You’ll want warm tones to keep the forest feeling cozy rather than cold or spooky.
It works best with natural materials. Wood. Wool. Cotton. Plastics and laminates break the spell. They feel too modern, too sharp. The forest is soft. The room should be too.
There’s a point where you have to step back. The child’s imagination will fill in the rest. You’ve provided the stage. They provide the plot.
The previous setup leaned heavily into soft pastels and floral accents. It was sweet. But strip away those pink ruffles and you uncover a blank canvas. Swap the bedding for deep greens and earth tones. Add a jute rug instead of a plush pink one. Change the curtains to a forest green. Suddenly, the room isn’t just for a little princess. It’s for a budding hero.
Wood furniture does the heavy lifting here. You want pieces that look like they belong in a storybook cottage but can actually survive a toddler’s tantrum. Look for solid wood. Pine or oak. Avoid particle board if you can help it. The charm needs to be real. The sturdiness needs to be real.
Choosing the Right Theme
Not every child wants to be a forest ranger. Some kids want speed. They want engines. They want to go.
If your toddler is obsessed with cars, you’re looking at a racetrack theme. It’s a different beast. It’s not about the quiet woods. It’s about the pit stop. But that’s for the next page. For now, focus on the transition.
The Practical Side of Toddler Decor
Decorating a toddler’s room is a balancing act. You want it to look good for photos. But you also need it to function.
Safety comes first. Anchor every tall piece of furniture. Even if it looks stable, it isn’t. Toddlers climb. They pull. They jump on beds. Use anti-tip brackets. Screw them into wall studs. Not just drywall.
Choose materials that can take a hit. Washable paint. Durable fabrics. Rugs with non-slip backing. If it can’t be vacuumed or wiped down, it doesn’t belong in a toddler’s space.
Making the Switch
You don’t need to buy new furniture to change the vibe. It’s the accessories that shift the narrative.
- Bedding: Switch from floral prints to geometric patterns or simple solids. Navy blue, charcoal, or forest green work well.
- Window Treatments: Blackout curtains are a must for naptime. Pick a color that anchors the room. Darker shades help with sleep cues.
- Rugs: Ditch the shag. Go for low-pile or flatweave. Easier to clean. Less tripping hazard.
The goal isn’t perfection. It’s adaptability. Kids outgrow themes faster than you can paint a wall. Build a foundation that can handle a few updates.
“Good design grows with the child. It doesn’t fight them.”
Next Steps
If the racetrack theme calls to you, we’ll break down how to execute it. How to do it without turning the room into a toy store. How to keep it stylish.
But for now, look at the room. Can you see it? The same four walls. Just a different soul.
Explore More
- Kids’ Rooms
- Baby Nursery Decorating Ideas
- Kids’ Bedroom Decorating Ideas
- Teen Bedroom Decorating Ideas
- Playroom Decorating Ideas
- Kids’ Bathroom Decorating Ideas
- Safety Tips for Decorating Kids’ Rooms
- Kids’ Rooms Decor
Race Car Bedroom Basics
Kids love cars. It’s a given. If yours are obsessed with race cars, lean into it. Start with the color palette. Primary colors work. Add black and white for contrast. The result is high-energy. It grabs attention.
The theme needs to be everywhere. Not just on the walls. Every corner should feel like part of the action. Take the window treatment. A standard valance is boring. Replace it with something loud. Use bright, high-contrast shapes. Let the kids have something visual to track.
DIY Window Treatments
You don’t need to buy expensive theme bedding. Build the vibe yourself. Measure the window. Cut fabric in geometric shapes. Triangles and stripes mimic speed. Sew or glue them together. Hang them above the frame. The view outside doesn’t matter. The fabric does the work.
Safety and Materials
Watch for small parts. Glue guns get hot. Keep them away from little hands. Use non-toxic paints if you’re decorating existing furniture. Check for loose screws on headboards. Kids climb. They jump. Secure everything firmly.
Where to Find Supplies
Fabric stores carry solid colors. Look for cotton blends. They’re easier to work with than synthetics. Paint stores have primers. Prime before you color. This helps the bright hues pop.
Which approach fits your budget? DIY is cheaper. Buying themed decor is faster. Pick one. Stick with it. The room will feel complete.
A flat wall gets boring fast. You need texture. You need depth. Imagine a wall that isn’t just a barrier, but a miniature roadway. It adds topography. It adds fun. Big gestures like this change the entire vibe of a room.
Toddlers live in their heads. Their imaginations are loud. If you build a magical play space, they’ll use it. Every time they walk into their bedroom, they’re not just in a room. They’re somewhere else.
Race Car Valance Instructions
This project transforms a standard cornice board into a themed focal point. It’s not just decoration. It’s a prop.
Materials List
You’ll need basic tools. A tape measure. Scissors. A sewing machine. An iron and ironing board are non-negotiable for crisp edges. You also need synthetic fiber for stuffing. Pins will keep things in place while you work.
For the structure, grab approximately 2 yards of race-car-themed fabric. You’ll also need 2 yards of polyester quilt batting, about 1/2 inch thick. Craft glue. And a staple gun with staples.
Step 1: Measure Twice
Start with the cornice. Measure the width of the front facing you want to cover. Add the widths of both side panels to that number. Then add 6 inches. This is your fabric width.
For height, measure the front facing of the cornice. Add 4 inches. Cut your fabric to these specs.
Step 2: Build the Checkerboard Points
Sew your main fabric pieces together first. Create the pattern you want.
Now for the details. You need checkerboard points. Cut 12 to 16 triangles from your fabric. Each triangle should be about 7 inches long. The widest point should be 6 inches.
Place them with the right sides facing. Stitch each triangle together. Leave the straight bottom edge open. Turn them right side out. Press them flat. Lightly stuff each with synthetic fiber.
Center these triangles along the bottom edge of your front-facing fabric. Align the raw edges. Stitch the points in place. This creates the bumpy, road-like texture.
Step 3: Assemble and Mount
Take your corniche board. Apply craft glue to the front and sides. Stick the quilt batting over it. Let it dry completely.
Stretch your main fabric over the board. Make sure it’s taut. Align it with the cornice board. The checkerboard points should hang neatly from the bottom edge.
Wrap the fabric edges around to the back of the board. Staple them in place. Do the same for the top. Stretch the fabric over the dust board. Wrap the edges around to the back. Staple.
Keep smoothing. Keep stapling. You want the fabric to lie flat. No wrinkles. No bubbles.
Once it’s mounted, you’re done. The room feels different now. It feels active.
More Decorating Ideas
If this valance sparks an idea, look further.
- Kids’ Rooms
- Baby Nursery Decorating Ideas
- Kids’ Bedroom Decorating Ideas
- Teen Bedroom Decorating Ideas
- Playroom Decorating Ideas
- Kids’ Bathroom Decorating Ideas
- Safety Tips for Decorating Kids’ Rooms
- Kids’ Rooms Decor
About the Authors
Mary Wynn Ryan has written dozens of interior design books. Titles include The Ultimate Kitchen, The Ultimate Bath, Cottage Style, Fresh Country Style, and Garden Style. She’s written for various magazines. She served as Midwest editor of Design Times magazine.
Heidi Tyline King is a writer and editor. She covers America’s arts, culture, and history. She writes about nature-based attractions and decorating projects. Her credits include All About Paint and Wallpaper, Beautiful Wedding Crafts, Pelican Guide to the Florida Panhandle, and The Unofficial Guide to the Southeast with Kids.